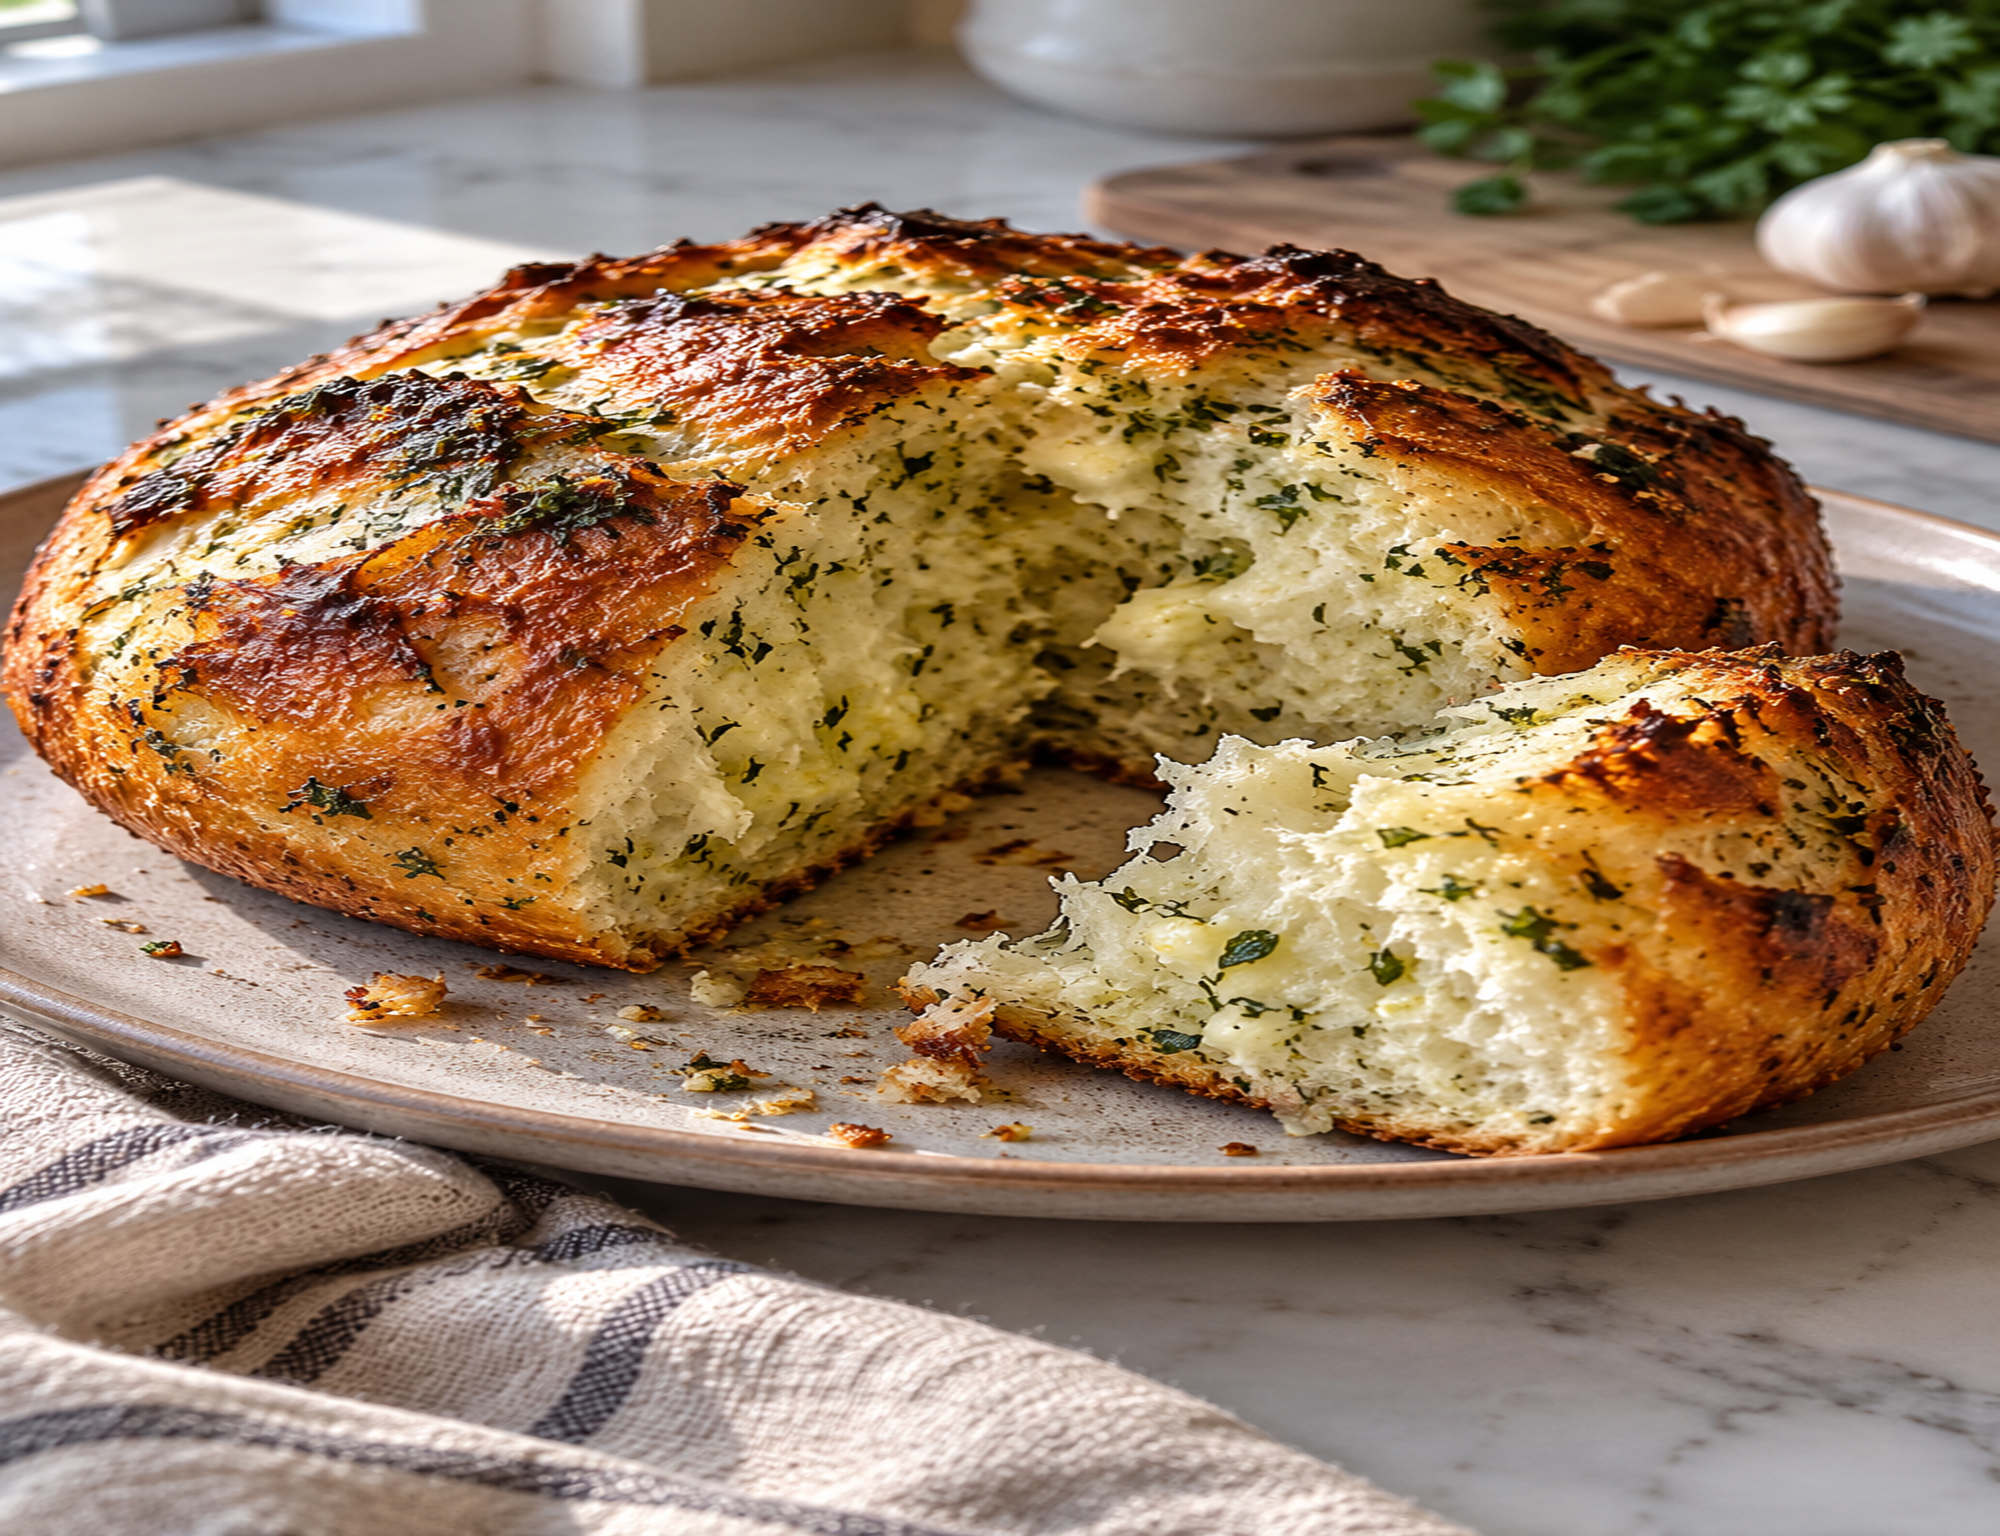
Garlic Herb Dutch Oven Bread – Crispy Crust and Soft, Fluffy Center
Homemade Garlic Herb Dutch Oven Bread has a golden, crispy crust, a soft and airy center, and plenty of savory garlic and fresh herb flavor. Baked in a preheated Dutch oven, this rustic round loaf develops a beautifully browned exterior while the inside stays tender and moist.
A simple garlic butter topping adds even more flavor without overpowering the bread itself. Serve it alongside soup, pasta, roasted vegetables, or a family dinner, or enjoy a warm slice on its own.
This recipe uses a straightforward yeast dough and does not require extensive kneading. Allow enough time for the dough to rise, then let the Dutch oven do the work of creating a crusty, artisan-style loaf in your own kitchen.
Why You’ll Love This Garlic Herb Bread
- Crispy, golden crust: A hot Dutch oven helps the loaf develop a deeply browned exterior.
- Soft, airy center: The moist dough creates an open, tender crumb when properly proofed and baked.
- Fresh garlic flavor: Garlic butter and herbs add savory flavor to the crust.
- Simple ingredients: Flour, water, yeast, salt, and a few flavorings form the foundation of this homemade bread.
- Versatile serving options: This rustic loaf works well with soups, pasta, salads, and roasted meals.
What Is Garlic Herb Dutch Oven Bread?
Dutch oven bread is baked in a heavy, covered pot that retains heat and traps moisture released by the dough. This creates a favorable environment for the loaf to expand before its crust becomes firm.
For this garlic herb version, the bread is baked until the crust is golden brown, then brushed with garlic butter and fresh herbs. The result is rustic bread with a savory finish and a tender interior.
Ingredients You’ll Need
For the Bread Dough
- 4 cups (500 g) bread flour: Bread flour provides a strong gluten structure and a pleasantly chewy crumb. All-purpose flour can also work, although the texture may be slightly different.
- 1 1/2 cups (360 g) warm water: Water hydrates the flour and helps the dough develop its airy texture. Use warm, not hot, water.
- 2 1/4 teaspoons (7 g) active dry yeast: Yeast helps the dough rise and gives the bread its characteristic texture.
- 1 1/2 teaspoons fine salt: Salt balances the flavor and supports proper dough development.
- 1 tablespoon olive oil: Adds a little richness and helps keep the crumb tender.
For the Garlic Herb Butter
- 3 tablespoons unsalted butter (42 g): Melted butter helps the herbs adhere to the crust and adds a rich finish.
- 3 garlic cloves, finely minced: Fresh garlic gives the topping its distinctive savory flavor.
- 2 tablespoons finely chopped fresh parsley: Adds fresh herbal flavor and natural green color.
- 1 teaspoon fresh thyme leaves: Adds a subtle earthy note. Use about 1/3 teaspoon dried thyme if fresh thyme is unavailable.
- 1 small pinch of black pepper: Optional, for a little extra flavor.
Equipment for the Best Results
- A 5- to 6-quart oven-safe Dutch oven with a lid
- A large mixing bowl
- A sturdy spoon or dough scraper
- Parchment paper rated for the baking temperature
- A kitchen scale or measuring cups and spoons
- A wire cooling rack
A Dutch oven is particularly useful because its heavy walls retain heat. A 5- to 6-quart pot gives a single round loaf room to expand. Always check the manufacturer’s temperature limits for the pot, lid, and handles before preheating.
How to Make Garlic Herb Dutch Oven Bread
Step 1: Mix the Dough
In a large bowl, combine the warm water and yeast. If using active dry yeast, allow the mixture to stand for about 5 to 10 minutes, following the yeast package instructions.
Add the bread flour, salt, and olive oil. Stir until the flour is hydrated and a rough, sticky dough forms. The dough should look moist and slightly shaggy rather than dry and firm.
Step 2: Let the Dough Rise
Cover the bowl with a lid, clean kitchen towel, or plastic wrap. Leave the dough in a comfortably warm place for approximately 60 to 90 minutes, or until it has noticeably expanded and looks airy.
Rising time depends on room temperature and yeast activity. A cooler kitchen may require additional time, so use the appearance of the dough rather than the clock alone.
Step 3: Shape the Loaf
Lightly flour a work surface and turn out the dough. With lightly floured hands, gently fold the edges toward the center to create a rounded loaf. Turn the dough seam-side down and carefully tighten its surface without pressing out all the air.
Place the loaf on parchment paper and cover loosely. Let it rest for about 20 to 30 minutes while you prepare the oven.
Step 4: Preheat the Dutch Oven
Place the empty Dutch oven and its lid in the oven. Preheat to 450°F (232°C) for approximately 30 minutes, or according to the cookware manufacturer’s instructions.
Use oven mitts when handling the hot pot. Keep the parchment suitable for the baking temperature and away from exposed heating elements.
Step 5: Bake the Bread
Carefully remove the hot Dutch oven. Using the parchment as a sling, lower the dough into the pot. Keep your hands clear of the hot sides and place the lid on securely.
Bake covered for 30 minutes. Remove the lid and continue baking for another 12 to 18 minutes, until the crust is deeply golden brown and the loaf is cooked through.
If you use an instant-read thermometer, the center of a lean loaf is generally around 200–210°F (93–99°C) when fully baked. Color and internal temperature are useful checks, especially if your oven runs hot or cool.
Step 6: Make the Garlic Herb Butter
While the bread finishes baking, melt the butter in a small saucepan over low heat or in a microwave-safe bowl. Stir in the minced garlic, parsley, thyme, and optional black pepper.
For a milder garlic flavor, warm the minced garlic gently in the butter for about 30 to 60 seconds. Avoid browning or burning the garlic, which can make the topping taste bitter.
Step 7: Brush and Cool
Remove the bread from the Dutch oven and transfer it to a wire rack. Brush the warm crust with the garlic herb butter, distributing the herbs naturally over the surface.
Let the loaf cool for at least 20 to 30 minutes before slicing. Cutting too early can compress the soft interior and release excess moisture before the crumb has finished setting.
Tips for a Crispy Crust and Fluffy Center
- Measure the flour carefully. Weighing flour is more consistent than scooping it directly into a measuring cup. Too much flour can make the loaf dense.
- Give the dough enough time to rise. Underproofed dough may produce a tight crumb and limited oven spring.
- Preheat the Dutch oven. A properly heated pot helps the dough expand and encourages a crisp crust.
- Avoid adding too much flour during shaping. The dough should remain slightly tacky. Excess flour can make the bread dry.
- Remove the lid for the final bake. This allows moisture to escape and the crust to brown.
- Let the bread cool before cutting. Cooling helps the interior finish setting and makes cleaner slices.
Common Mistakes to Avoid
Using Water That Is Too Hot
Excessively hot water can damage the yeast. Use comfortably warm water and follow the temperature guidance on your yeast package.
Adding Too Much Flour
A stiff, dry dough is harder to develop into a light loaf. Measure flour accurately and resist the temptation to keep adding flour simply because the dough feels sticky.
Skipping the Covered Baking Stage
The lid helps retain moisture during the early part of baking. Baking uncovered for the entire time may result in a crust that sets before the loaf has fully expanded.
Burning the Garlic
Fresh garlic can become bitter when exposed to excessive heat. Prepare the garlic butter separately and brush it onto the bread after baking for a more controlled flavor.
Easy Variations
Rosemary Garlic Bread
Replace the thyme with finely chopped fresh rosemary. Rosemary has a stronger flavor, so start with a small amount and adjust to taste.
Parmesan Garlic Herb Bread
Sprinkle a small amount of finely grated Parmesan over the loaf during the final few minutes of baking. Watch closely because cheese can brown quickly.
Extra Garlic Butter Bread
Reserve a little garlic herb butter for serving. Spread it over individual warm slices just before eating.
Dried Herb Version
If fresh herbs are unavailable, use small amounts of dried parsley and thyme. Dried herbs are more concentrated, so start with less and adjust according to your preference.
What to Serve with Garlic Herb Bread
- Tomato soup: A warm slice is ideal for dipping into a bowl of tomato soup.
- Pasta dishes: Serve alongside spaghetti, baked pasta, or a creamy mushroom pasta.
- Roasted vegetables: The savory bread complements roasted carrots, broccoli, and seasonal vegetables.
- Salads: Pair it with a fresh green salad for a simple lunch.
- Family dinners: Place the loaf in the center of the table as a shareable side dish.
How to Store Homemade Garlic Herb Bread
Allow the loaf to cool completely before storing it. Keep the bread in a bread bag or airtight container at room temperature for about 1 to 2 days for the best texture. Garlic butter can soften the crust over time, which is normal.
For longer storage, slice the cooled bread, wrap it well, and freeze it for up to 2 months for best quality. Separate slices with parchment if you want to remove only what you need.
How to Reheat
For a whole or large piece of bread, warm it in a 325°F (163°C) oven until heated through. For individual slices, use a toaster oven or skillet. If the bread seems dry, add a small amount of butter before reheating.
Because the topping contains fresh garlic and butter, refrigerate leftovers that have been generously coated with garlic butter if they will not be eaten within a short period. Refrigeration can firm the crumb, so reheat before serving. Discard bread that shows mold or signs of spoilage.
Frequently Asked Questions
Can I use all-purpose flour instead of bread flour?
Yes. All-purpose flour can produce a good loaf, although the crumb may be slightly less chewy. Add the water gradually if you need to adjust the dough’s consistency.
Do I need to knead Dutch oven bread?
This recipe does not require extensive kneading. Mixing the dough thoroughly and allowing sufficient rising time helps develop its structure. Gentle folding during shaping is usually enough for this method.
Why is my bread dense?
Common causes include too much flour, inactive yeast, insufficient rising time, or cutting the bread before it has cooled. Check the yeast’s freshness and allow the dough to expand visibly before shaping.
Can I prepare the dough ahead of time?
You can experiment with a refrigerated overnight rise, but fermentation will proceed more slowly in the refrigerator. Cover the dough well, allow extra time for it to warm and finish rising when necessary, and check its condition before shaping and baking.
Can I make this bread without a Dutch oven?
Yes, although the crust may be different. Bake the loaf on a preheated heavy baking sheet or baking stone at the same oven temperature, watching closely for doneness. A suitable oven-safe cover can help retain moisture during the initial bake, but never use cookware or covers that are not rated for the temperature.
When should I add the garlic butter?
Brush the garlic herb butter onto the crust after baking. This preserves the fresh herb flavor and reduces the risk of burning the garlic during the longer baking period.
Final Thoughts
This Garlic Herb Dutch Oven Bread combines a rustic, golden crust with a soft interior and savory garlic herb butter. With a few basic ingredients, enough time for the dough to rise, and a properly preheated Dutch oven, you can make a satisfying homemade loaf for everyday meals or special dinners.
Serve it warm, save a few slices for later, and experiment with your favorite herbs to make the recipe your own.
Garlic Herb Dutch Oven Bread Recipe
A rustic homemade bread with a crispy golden crust, soft center, and flavorful garlic herb butter.
Prep Time: 20 minutes
Rise Time: 80–120 minutes, approximately
Cook Time: 42–48 minutes
Rest Time: 20–30 minutes
Total Time: Approximately 3 hours to 3 hours 40 minutes
Yield: 1 round loaf
Servings: 10 slices
Ingredients
- 4 cups (500 g) bread flour
- 1 1/2 cups (360 g) warm water
- 2 1/4 teaspoons (7 g) active dry yeast
- 1 1/2 teaspoons fine salt
- 1 tablespoon olive oil
- 3 tablespoons (42 g) unsalted butter
- 3 garlic cloves, finely minced
- 2 tablespoons chopped fresh parsley
- 1 teaspoon fresh thyme leaves
- Black pepper, optional
Instructions
- Combine the warm water and yeast in a large mixing bowl. Let stand for 5–10 minutes if directed by the yeast package.
- Add the bread flour, salt, and olive oil. Mix until a rough, sticky dough forms.
- Cover and let rise for 60–90 minutes, or until visibly expanded and airy.
- Gently shape the dough into a round loaf. Place on parchment, cover loosely, and rest for 20–30 minutes.
- Preheat a covered 5- to 6-quart Dutch oven at 450°F (232°C) for about 30 minutes, following the cookware manufacturer’s instructions.
- Carefully transfer the dough with the parchment into the hot Dutch oven. Cover and bake for 30 minutes.
- Remove the lid and bake for another 12–18 minutes, until golden brown and cooked through.
- Melt the butter and stir in the minced garlic, parsley, thyme, and optional black pepper. Warm gently without browning the garlic.
- Transfer the bread to a wire rack and brush the crust with the garlic herb butter.
- Cool for 20–30 minutes before slicing and serving.
Recipe Notes
- Weighing the flour helps produce a more consistent result.
- Rising times vary with room temperature and yeast activity.
- Use parchment paper and cookware rated for the oven temperature.
- For a milder garlic flavor, warm the garlic gently in the butter before brushing.
- Store cooled bread in a bread bag at room temperature for 1–2 days for best texture. Freeze well-wrapped slices for up to 2 months for best quality.